Using Alpine JS
AlpineJS is a framework which makes basic JavaScript operations on web pages easier and faster to program. It allows you to program behavior directly into HTML-tags, which would usually take multiple lines of JavaScript instead.
AlpineJS itself gives the following example, simply pasted into a blank .html-file:
<html>
<head>
    <script defer src="https://unpkg.com/alpinejs@3.x.x/dist/cdn.min.js"></script>
</head>
<body>
    <h1 x-data="{ message: 'I ❤️ Alpine' }" x-text="message"></h1>
</body>
</html>
As you can see one just needs to reference the framework in a script tag to use it straight from the AlpineJS content delivery network (CDN):
<head>
    <script defer src="https://unpkg.com/alpinejs@3.x.x/dist/cdn.min.js"></script>
</head>
Then you can start to use one of the many kinds of behavior directives you can insert into HTML-tags:
<h1 x-data="{ message: 'I ❤️ Alpine' }" x-text="message"></h1>
The example above would yield you I ❤️ Alpine.
Check out the full documentation with all the options here.
Data from a GET request
To start off we will be displaying data we receive from a GET request using AlpineJS. The first step is to reference the framework in a script tag once again:
<html>
<head>
    <script defer src="https://unpkg.com/alpinejs@3.5.0/dist/cdn.min.js"></script>
</head>
</html>
Getting the info
Then we will set up the scope in which our data variables will exist. By adding x-data= to a <div>-tag we make it so that all the variables and functions that we make and declare in that x-data= will exist and be relevant to everything inside that <div>-tag. Everything outside of that tag will not know anything about the variables and functions we declared inside the x-data=:
<html>
<head>
    <script defer src="https://unpkg.com/alpinejs@3.5.0/dist/cdn.min.js"></script>
</head>
<body>
    <div x-data="{
    }">
    </div>
</body>
</html>
To follow that up we will be performing a GET request and retrieving the data inside of the x-data= by:
- declaring an empty variable
responsedatathat will hold our data - declaring a function that will hold the logic to fill the
responsedatavariable up with data - using the Fetch API to perform the GET request and parse the retrieved data to JSON
<html>
<head>
    <script defer src="https://unpkg.com/alpinejs@3.5.0/dist/cdn.min.js"></script>
</head>
<body>
    <div x-data="{
        responsedata: null,
        async getData() {
            this.responsedata = await (await fetch('https://jsonplaceholder.typicode.com/posts')).json();
        }
    }">
    </div>
</body>
</html>
Displaying text
Now we move on to displaying text, using the x-text= directive inside HTML tags. In this case we use a <strong>-tag that will hold the x-text=. Similar to Thymeleaf and other templating engines this will result in the <strong>-tag containing whatever is in the variable we place after the x-text=. However, unlike those templating engines, this has JavaScript running behind the scenes that will auto-update the content whenever the variable changes:
<html>
<head>
    <script defer src="https://unpkg.com/alpinejs@3.5.0/dist/cdn.min.js"></script>
</head>
<body>
    <div x-data="{
        responsedata: null,
        async getData() {
            this.responsedata = await (await fetch('https://jsonplaceholder.typicode.com/posts')).json();
        }
    }">
        Data returned: <strong x-text="responsedata[0].title">Placeholder</strong>
    </div>
</body>
</html>
Then we will look at what to use to trigger the getData() function that will fill up the responsedata variable and so display data.
The first option is using a button. For that we use a x-on: directive that listens for an event. To that end we extend it to x-on:click, which will make it listen for a click event on that HTML tag where the x-on:click= is placed into, like a button. Then we will tie this event to a function we declared earlier:

<html>
<head>
    <script defer src="https://unpkg.com/alpinejs@3.5.0/dist/cdn.min.js"></script>
</head>
<body>
    <div x-data="{
        responsedata: null,
        async getData() {
            this.responsedata = await (await fetch('https://jsonplaceholder.typicode.com/posts')).json();
        }
    }">
        <button x-on:click="getData">Send get request</button>
        Data returned: <strong x-text="responsedata[0].title">Placeholder</strong>
    </div>
</body>
</html>
The second option is automatically using the function when an HTML tag is initialized and loaded. For that we use a x-init= directive on the same <div>-tag:
<html>
<head>
    <script defer src="https://unpkg.com/alpinejs@3.5.0/dist/cdn.min.js"></script>
</head>
<body>
    <div x-data="{
        responsedata: null,
        async getData() {
            this.responsedata = await (await fetch('https://jsonplaceholder.typicode.com/posts')).json();
        }
    }" x-init="getData">
        Data returned: <strong x-text="responsedata[0].title">Placeholder</strong>
    </div>
</body>
</html>
Performing a POST request
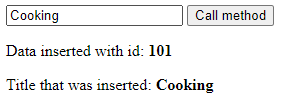
Performing a POST request is quite similar. The main difference being:
posttitle: a variable that will be filled out by us using an<input>-tag on the pagex-model="posttitle"in an<input type="text">-tag to make it so that everything that gets entered into the<input>-tag also automatically gets placed into theposttitlevariablefetch()API call that also includes themethodwe will be using, the JSONbodywe will be including in the post and theheadersthat will send along the needed header data.

<html>
<head>
    <script defer src="https://unpkg.com/alpinejs@3.5.0/dist/cdn.min.js"></script>
</head>
<body>
    <div x-data="{
        responsedata: null,
        posttitle: null,
        async callmethod1() {
            this.responsedata = await (await fetch('https://jsonplaceholder.typicode.com/posts',
            {
                method: 'POST',
                body: JSON.stringify({
                    title: this.posttitle,
                    body: 'bar',
                    userId: 1,
                }),
                headers: {
                    'Content-type': 'application/json; charset=UTF-8',
                },
            })).json();

            console.log(this.responsedata);
        },
    }">
        <input type="text" x-model="posttitle">
        <button x-on:click="callmethod1">Call method</button>

        <p>Data inserted with id: <strong x-text="responsedata.id"></strong></p>
        <p>Title that was inserted: <strong x-text="responsedata.title"></strong></p>

    </div>
</body>
</html>
Deploying
Deploying these simple AlpineJS files can be done in various ways as it is a simple static site.
A good example of this is using GitHub Pages.
One of the examples has been deployed in that manner from this repository, to this URL: https://miverboven.github.io/alpinetest/
