Implementing OAuth
Now that we have the passwords hashed, let's make the application actually secure using JWT tokens and OAuth.
What is OAuth 2.0?
The OAuth protocol specifies a process for resource owners to authorize third-party applications in accessing their server resources without sharing their credentials. This fixes one of the big drawbacks of HTTP Basic Auth where user credentials were sent to the server with every request. Instead it uses a access token, given out at first authentication. This token is then used for the following requests instead.
OAuth 2.0 is the latest release of this OAuth protocol, mainly focused on simplifying the client-side development. Note that OAuth 2.0 is a completely new protocol, and this release is not backwards-compatible with OAuth 1.0. The following are some of the major improvements in OAuth 2.0, as compared to the previous release:
- The complexity involved in signing each request: Unlike OAuth 1.0, OAuth 2.0 requires neither the client nor the server to generate any signature for securing the messages. Security is enforced via the use of TLS/SSL (HTTPS) for all communication.
- Addressing non-browser client applications: OAuth 2.0 accommodates more authorization flows suitable for specific client needs that do not use any web UI, such as on-device (native) mobile applications or API services. This makes the protocol very, where OAuth 1.0 was designed for web applications only.
- The separation of roles: OAuth 2.0 clearly defines the roles for all parties involved in the communication, such as the client, resource owner, resource server, and authorization server.
- The short-lived access token: Unlike in the previous version, the access token in OAuth 2.0 can contain an expiration time, which improves the security and reduces the chances of illegal access.
- The refresh token: OAuth 2.0 offers a refresh token that can be used for getting a new access token on the expiry of the current one, without going through the entire authorization process again.
Before we get into the details of OAuth 2.0, let’s take a quick look at how OAuth 2.0 defines roles for each party involved in the authorization process:
- The resource owner: This refers to an entity capable of granting access to a protected resource. In a real-life scenario, this can be an end user who owns the resource.
- The resource server: This hosts the protected resources. The resource server validates and authorizes the incoming requests for the protected resource by contacting the authorization server.
- The client (consumer): This refers to an application that tries to access protected resources on behalf of the resource owner. It can be a business service, mobile, web, or desktop application.
- Authorization server: This, as the name suggests, is responsible for authorizing the client that needs access to a resource. After successful authentication, the access token is issued to the client by the authorization server. In a real-life scenario, the authorization server may be either the same as the resource server or a separate entity altogether. The OAuth 2.0 specification does not really enforce anything on this part.
The following is a quick summary of the authorization flow in a typical OAuth 2.0 implementation:
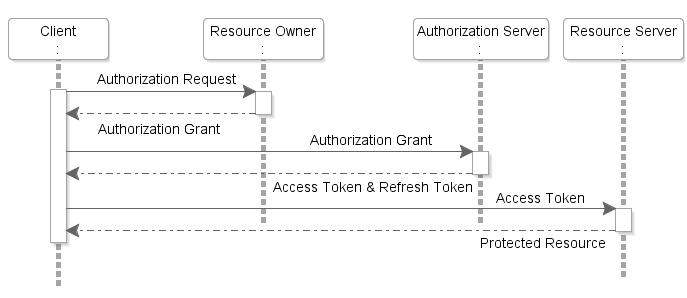
Let’s understand the diagram in more detail:
- The client application requests authorization to access the protected resources from the resource owner (user). The client can either directly make the authorization request to the resource owner or via the authorization server by redirecting the resource owner to the authorization server endpoint.
- The resource owner authenticates and authorizes the resource access request from the client application and returns the authorization grant to the client. The authorization grant type returned by the resource owner depends on the type of client application that tries to access the OAuth protected resource. Note that the OAuth 2.0 protocol defines four types of grants in order to authorize access to protected resources.
- The client application requests an access token from the authorization server by passing the authorization grant along with other details for authentication, such as the client ID, client secret, and grant type.
- On successful authentication, the authorization server issues an access token (and, optionally, a refresh token) to the client application.
- The client application requests the protected resource (RESTful web API) from the resource server by presenting the access token for authentication.
- On successful authentication of the client request, the resource server returns the requested resource.
About JSON Web Tokens
The tokens we will use with OAuth 2.0 are JWT, meaning "JSON Web Tokens".
It's a standard to codify a JSON object in a long dense string without spaces. It looks like this:
eyJhbGciOiJIUzI1NiIsInR5cCI6IkpXVCJ9.eyJzdWIiOiIxMjM0NTY3ODkwIiwibmFtZSI6IkpvaG4gRG9lIiwiaWF0IjoxNTE2MjM5MDIyfQ.SflKxwRJSMeKKF2QT4fwpMeJf36POk6yJV_adQssw5c
It is not encrypted, so, anyone could recover the information from the contents. But it is signed. So, when you receive a token that you emitted, you can verify that you actually emitted it.
That way, you can create a token with an expiration of, let's say, 1 week. And then when the user comes back the next day with the token, you know that user is still logged in to your system.
After a week, the token will be expired and the user will not be authorized and will have to sign in again to get a new token. And if the user (or a third party) tried to modify the token to change the expiration, you would be able to discover it, because the signatures would not match.
Below is another example of a JWT:

The JWT specification defines seven reserved claims that are not required, but are recommended. These are:
iss(issuer): Issuer of the JWTsub(subject): Subject of the JWT (the user)aud(audience): Recipient for which the JWT is intendedexp(expiration time): Time after which the JWT expiresnbf(not before time): Time before which the JWT must not be accepted for processingiat(issued at time): Time at which the JWT was issued; can be used to determine age of the JWTjti(JWT ID): Unique identifier; can be used to prevent the JWT from being replayed (allows a token to be used only once)
Applying it to our application
We are going to start from where we left off in the previous chapter about hashing and increment it.
Edit auth.py to create JWTs
Verifying passwords
Open up the auth.py file and add a function to verify passwords:
def verify_password(plain_password, hashed_password):
    return pwd_context.verify(plain_password, hashed_password)
Authenticating users
Our new function will be used to authenitcate a user. Besides our verify_password function we will also need a function from the crud.py file. Add the following imports:
import crud
from sqlalchemy.orm import Session
Then add our authenticate_user function. Note that we need to add db: Session as a argument because it needs to be used by our crud function:
def authenticate_user(db: Session, username: str, password: str):
    user = crud.get_user_by_email(db, username)
    if not user:
        return False
    if not verify_password(password, user.hashed_password):
        return False
    return user
Creating JWTs
Now we will be creating our first JWT. We need to install python-jose to generate and verify JWT in Python:
pip install "python-jose[cryptography]"
Warning
Do not use the automated pip installs from Pycharm to import jose, it will not import the correct item.
Add the following imports:
from jose import JWTError, jwt
from datetime import datetime, timedelta
Then we define some variables, below the imports, to use during our token encoding:
# to get a string like this run:
# openssl rand -hex 32
SECRET_KEY = "09d25e094faa6ca2556c818166b7a9563b93f7099f6f0f4caa6cf63b88e8d3e7"
ALGORITHM = "HS256"
ACCESS_TOKEN_EXPIRE_MINUTES = 30
You should generate your own random secret key:
openssl rand -hex 32

09d25e094faa6ca2556c818166b7a9563b93f7099f6f0f4caa6cf63b88e8d3e7
If you are running Windows and would still like to use openssl you can download an installer for it here. You can then use the following app on your machine to run the openssl commands:

Then we can add the create_access_token function:
def create_access_token(data: dict):
    to_encode = data.copy()
    expires_delta = timedelta(minutes=ACCESS_TOKEN_EXPIRE_MINUTES)
    if expires_delta:
        expire = datetime.utcnow() + expires_delta
    else:
        # Default to 15 minutes of expiration time if ACCESS_TOKEN_EXPIRE_MINUTES variable is empty
        expire = datetime.utcnow() + timedelta(minutes=15)
    # Adding the JWT expiration time case
    to_encode.update({"exp": expire})
    encoded_jwt = jwt.encode(to_encode, SECRET_KEY, algorithm=ALGORITHM)
    return encoded_jwt
Edit main.py to create a login endpoint
Creating an endpoint to log in and get a token
First of all add the needed imports:
from fastapi.security import OAuth2PasswordBearer, OAuth2PasswordRequestForm
import auth
Then we add our new endpoint /token. We need to use /token because this will allow our OpenAPI docs to display it correctly in the interface.
@app.post("/token")
def login_for_access_token(form_data: OAuth2PasswordRequestForm = Depends(), db: Session = Depends(get_db)):
    #Try to authenticate the user
    user = auth.authenticate_user(db, form_data.username, form_data.password)
    if not user:
        raise HTTPException(
            status_code=401,
            detail="Incorrect username or password",
            headers={"WWW-Authenticate": "Bearer"},
        )
    # Add the JWT case sub with the subject(user)
    access_token = auth.create_access_token(
        data={"sub": user.email}
    )
    #Return the JWT as a bearer token to be placed in the headers
    return {"access_token": access_token, "token_type": "bearer"}
This endpoint will be automatically called by the OpenAPI docs "Authorize" interface. After a successful login it will also place the JWT in the header of each following request.
Making an endpoint require a token
Before we test, let us secure one endpoint. To do this first create an oauth2_scheme above the list of endpoints in your file:
oauth2_scheme = OAuth2PasswordBearer(tokenUrl="token")


@app.post("/token")
def login_for_access_token(form_data: OAuth2PasswordRequestForm = Depends(), db: Session = Depends(get_db)):
    user = auth.authenticate_user(db, form_data.username, form_data.password)
    if not user:
        raise HTTPException(
            status_code=401,
            detail="Incorrect username or password",
            headers={"WWW-Authenticate": "Bearer"},
        )
    access_token = auth.create_access_token(
        data={"sub": user.email}
    )
    return {"access_token": access_token, "token_type": "bearer"}
Then edit an endpoint. Let us use the /users/ endpoint. To make it require authorization, simply add , token: str = Depends(oauth2_scheme) to the arguments of the function tied to the endpoint. We will not be using the token but the fact alone that it is placed as an argument will make the endpoint require authorization:
@app.get("/users/", response_model=list[schemas.User])
def read_users(skip: int = 0, limit: int = 100, db: Session = Depends(get_db), token: str = Depends(oauth2_scheme)):
    users = crud.get_users(db, skip=skip, limit=limit)
    return users
Testing
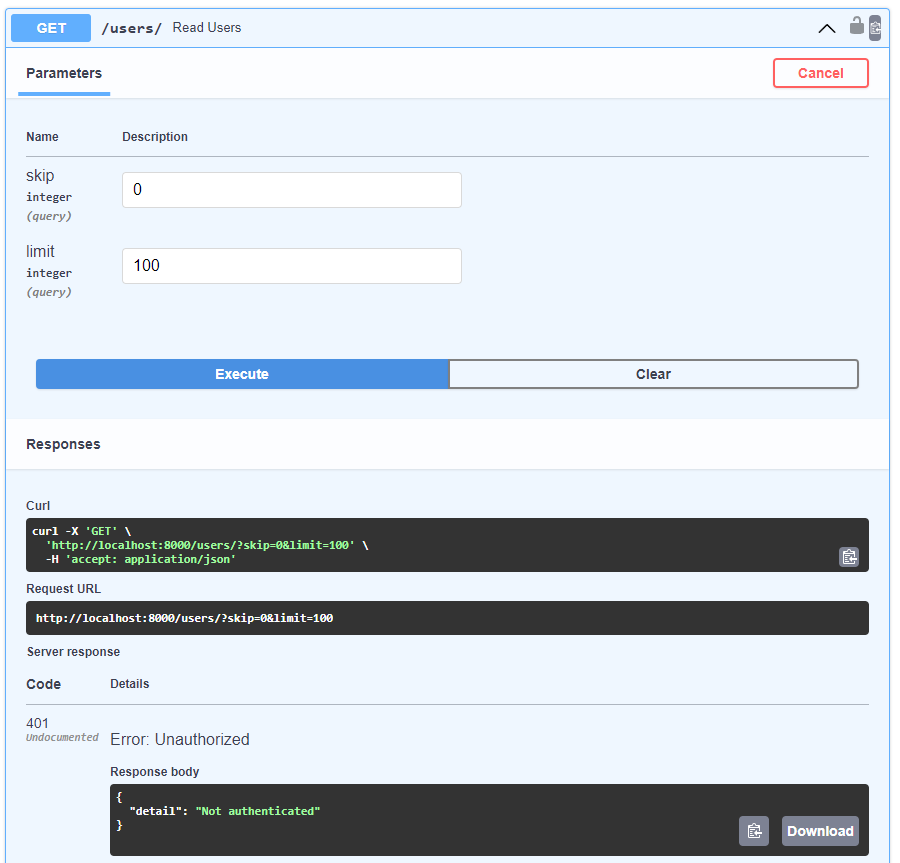
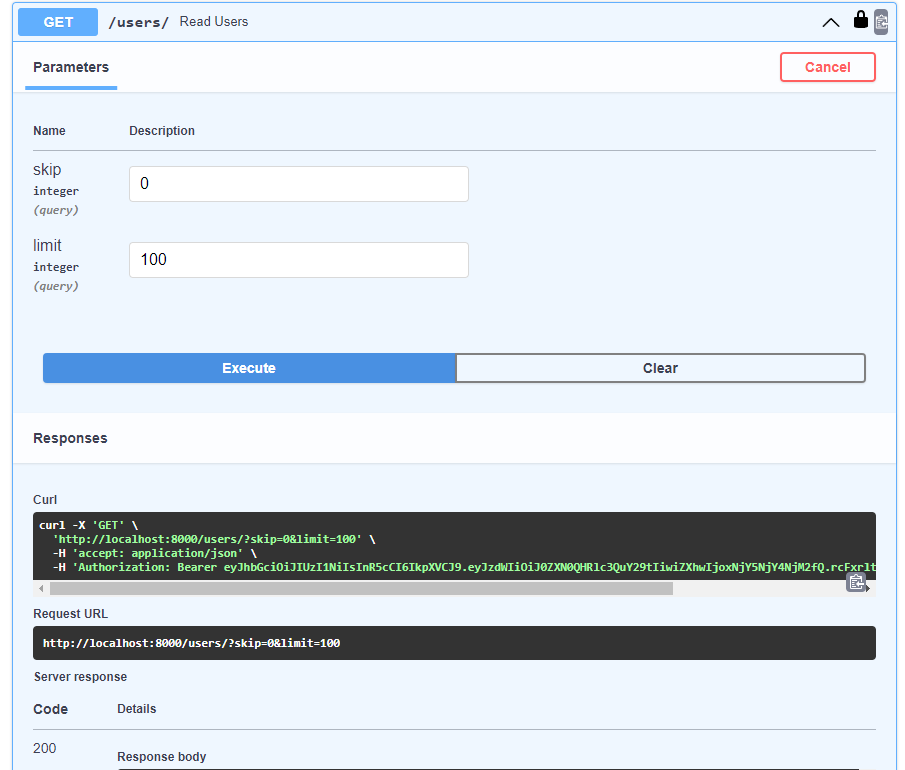
Run the application and go try out the Read users endpoint. You should get a HTTP 401 error without logging in:
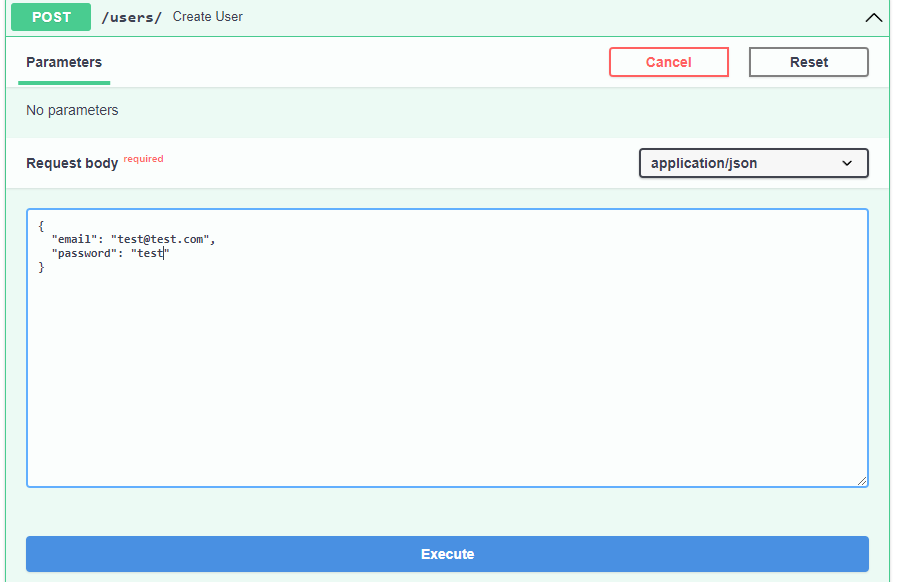
Create a new user:
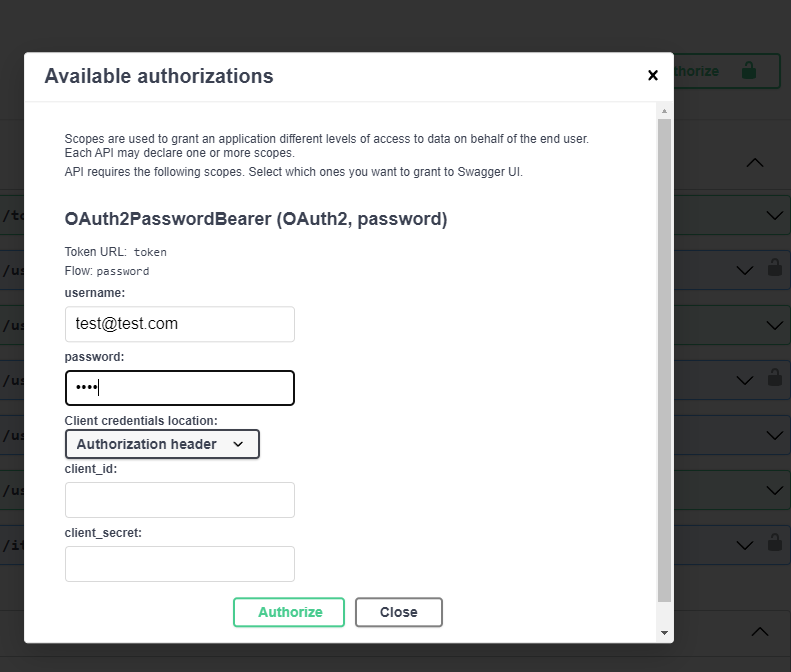
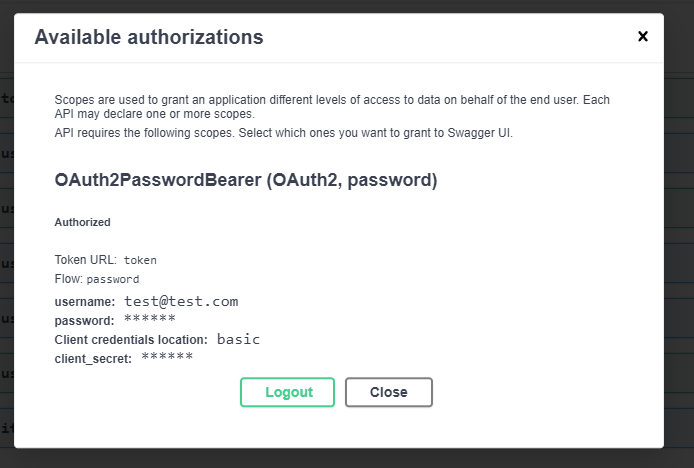
Use the new user to log in:
After a successful login you should see the details of your login:
Try the Read users endpoint again. You should get a successful HTTP 200 reply:
Edit auth.py for logged in user data
Lastly we will be implementing a way to read the user data from the currently logged-in user.
Adding functions to get the current user
First add the following imports and the oauth2_scheme to auth.py:
from fastapi.security import OAuth2PasswordBearer
from fastapi import Depends, HTTPException, status

oauth2_scheme = OAuth2PasswordBearer(tokenUrl="token")
Then add the following function which will take a token and decode it. If it is decoded without any JWTErrors, it will then use the email in the username sub case of the JWT to search the database for the user:
def get_current_user(db: Session, token: str = Depends(oauth2_scheme)):
    credentials_exception = HTTPException(
        status_code=status.HTTP_401_UNAUTHORIZED,
        detail="Could not validate credentials",
        headers={"WWW-Authenticate": "Bearer"},
    )
    try:
        payload = jwt.decode(token, SECRET_KEY, algorithms=[ALGORITHM])
        username: str = payload.get("sub")
        if username is None:
            raise credentials_exception
    except JWTError:
        raise credentials_exception
    user = crud.get_user_by_email(db, username)
    if user is None:
        raise credentials_exception
    return user
We can also add an additional function that will use the previous function, but also check if the user is active by the is_active bool in a User class:
def get_current_active_user(db: Session, token: str = Depends(oauth2_scheme)):
    current_user = get_current_user(db, token)
    if not current_user.is_active:
        raise HTTPException(status_code=400, detail="Inactive user")
    return current_user
Edit main.py for a logged in user endpoint
Adding an endpoint to show the currently logged in user
Add the following endpoint:
@app.get("/users/me", response_model=schemas.User)
def read_users_me(db: Session = Depends(get_db), token: str = Depends(oauth2_scheme)):
    current_user = auth.get_current_active_user(db, token)
    return current_user
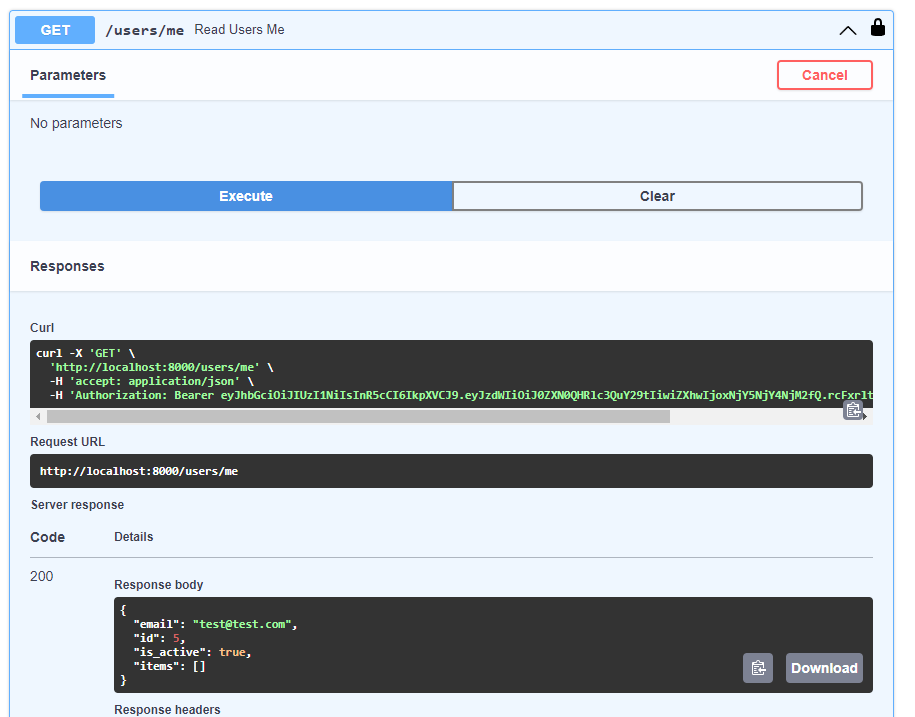
This endpoint will of course require the user to be logged in. It will then work and show the user their user data. Using this knowledge you should be able to use this username in other endpoints, for example:
- To show a users inventory
- To show a users purchases
- To add a new high score with the currently logged in user and only let a logged in user do that themselves
- ...
Testing
Use the new user from the previous test to log in again:

After a successful login you should see the details of your login:

Then use the /users/me endpoint:
Congratulations on your secured API! 🎉
The completed example
Check out the completed example here.
