Containerization
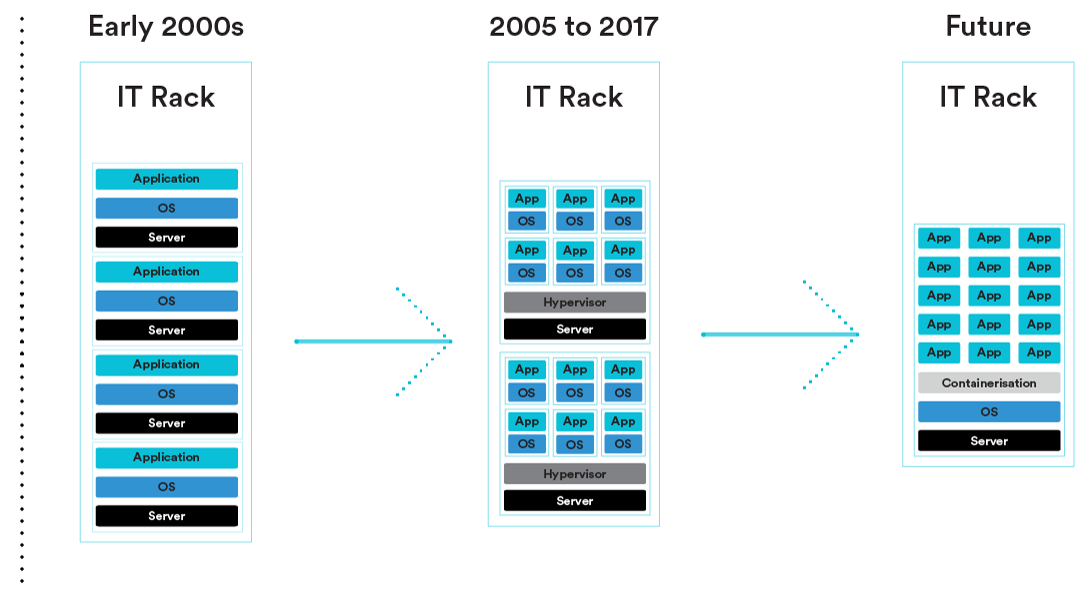
Even back in 2017 containers and containerization were already recognized as the next step in virtualization formats to host services and applications, as this image from 2017 shows:

In the current day containerization is an essential part of application deployment, especially for API's, which is why we will be using containers to package and deploy our applications.
What is a Container
Containers are a way to package applications including all their dependencies and necessary files while keeping them isolated from other containers, other applications or components in the same system.

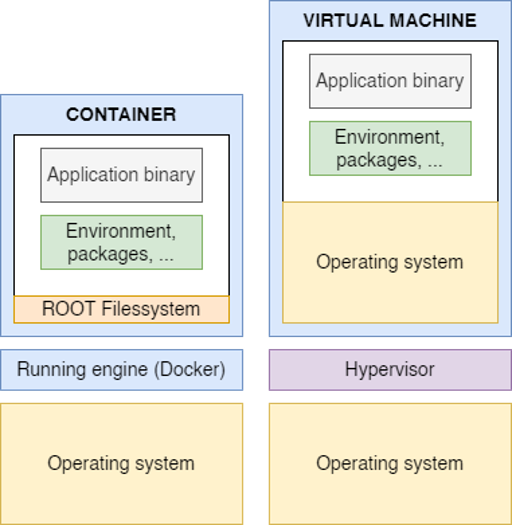
Linux containers run using the same Linux kernel of the host (machine, virtual machine, cloud server, etc). This just means that they are very lightweight compared to full virtual machines which emulate an entire operating system. This way, containers consume little resources, an amount comparable to running the processes directly. A virtual machine would consume much more.
Containers also have their own isolated running processes, file system, and network. This simplifies deployment, security, development, etc.
Container Images & Docker
Docker has been one of the main tools to create and manage container images and containers:
- A container image is a static version of all the files, environment variables, and the default command/program that should be present in a container. Static here means that the container image is not running, it's not being executed. We're only talking about the packaged files and metadata.
- A "container" normally refers to the running instance that we start based on a container image. A container is running only when it has a process running inside it. The container stops when there's no process running in it. When a process in the container saves files in the container, those changes will exist only in that container. It will not persist in the underlying container image.
Docker Hub
There is a public Docker Hub with pre-made official container images for many tools, environments, databases, and applications. For example, there's an official Python Image.
And there are many other images for different things like databases, for example for:
By using a pre-made container image it's very easy to combine and use different tools. For example, to try out a new database. In most cases, you can use the official images, and just configure them with environment variables.
So, you would run multiple containers with different things, like a database, a Python application, a web server with a React frontend application, and connect them together via their internal network. All the container management systems (like Docker or Kubernetes) have these networking features integrated into them.
For now create an account on Docker Hub.
Docker for Desktop
We shall be using the quite recent user-friendly Docker Desktop system. If you are using a Windows system you will need to enable and install WSL2 first, otherwise you can skip straight to the Docker for Desktop installation.
If you can run this command successfully your installation should be working:
docker ps
VirtualBox hypervisor conflicts
Older versions of VirtualBox used to conflict with Docker Desktop due to the usage of Hyper-V. Since Docker Desktop has included the possibility to use WSL2 instead of Hyper-V, the newer version of VirtualBox do not present this conflict anymore.
Containers and Processes
A container image normally includes in its metadata the default program or command that should be run when the container is started and the parameters to be passed to that program. Very similar to what would be if it was in the command line.
When a container is started, it will run that command/program (although you can override it and make it run a different command/program).
A container is running as long as the main process is running. It normally has a single process, but it's also possible to start subprocesses from the main process, and that way you will have multiple processes in the same container.
But it's not possible to have a running container without at least one running process. If the main process stops, the container stops.
Docker in practice: Basic commands with Ubuntu
Enter this into PowerShell (or Terminal), we will call this CLI1:
docker run -it ubuntu /bin/bash
This command:
- Runs the container
- Runs the bash process.
- Has the
-itinteractive flag so you can use normal bash commands in the Linux container in an interactive way, such asls. Your current command line window gets taken over and attached to the process you started, stdin.

Now open a second PowerShell (or Terminal), which we will call CLI2, and type in:
docker ps
This lists the currently running containers.

On CLI1 exit the container and the Linux file system again:
CLI1: exit
List the currently running containers on your system, which should return an empty list:
CLI2: docker ps

Try to list all containers, the running ones and the stopped ones:
CLI2: docker ps -a

We can restart a container that was previously running:
CLI1: docker start container_identifier

Check that the container comes up as running again. Remark that the creation datetime is not the same as the running status datetime:
CLI2: docker ps

We can also re-attach our CLI1 window to the container:
CLI1: docker attach container_identifier

If you stop the running container you will be automatically kicked out of the interactive command line.
CLI2: docker stop container_identifier

The container is not running anymore, hence it is not listed here:
docker ps
The container is still in our system, but stopped:
docker ps -a
Remove the container to clean up:
docker rm container_identifier
Check if the container is gone:
docker ps -a

This covers the basics of Docker commands. You can find the full list in the Docker Docs.
Docker in practice: Docker run with MySQL
Docker is ideal to use when developing with databases. Instead of installing a multitude of databases you can just use containerized databases. We will look at MySQL as an example of this and look deeper into the docker run command as well. This section is based on the following article.
To start off we will run a MySQL container with the following command:
docker run --name mysql -d -p 3306:3306 -e MYSQL_ROOT_PASSWORD=abc123 --restart unless-stopped mysql:8
The mysql:8 at the end of the command refers to the container image we want to set up as container. MySQL has an official Docker image available on Docker Hub. First identify the image tag you should use. MySQL versions 5.6, 5.7, and 8.0 are available.
The :latest tag points to the latest release, currently 8.0. Avoid using this tag, as it means you could unintentionally receive a major MySQL version upgrade in the future. Specifically referencing the version you want allows for a more controlled approach to updates. This is why we use :8.
Starting a MySQL container for the first time will automatically create an initial root user. You need to either supply a password for this user or ask MySQL to generate one. In this case we pass along a value for an environment variable using -e to customize the password.
The -d flag means the container will run in the background until it’s stopped, independently of your terminal session. You can view the container’s startup logs with docker logs mysql --follow. When “ready for connections” appears, your MySQL database is accessible:

The --restart parameter instructs Docker to always restart the container. This means your MySQL database will run without intervention after host machine reboots or Docker daemon updates. The unless-stopped policy used here won’t start the container if you manually stopped it with docker stop.
Docker’s -p <host_port>:<container_port> flag enables port forwarding into the container so you’ll be able to access your database on localhost:3306. This is the default MySQL port; this example forwards port 3306 on your host to the same port inside the container. Use your favorite MySQL client such as MySQL Workbench to connect over this port with root and your chosen password as user credentials.

Port conflicts
Port 3306 is the standard port for MySQL, meaning that if you already have a MySQL instance installed and running this port will be occupied. In that case you can change the host port in the flag to, for example, -p 3307:3306
Persisting Data With Volumes
While the container created above is a fully functioning MySQL server, you need to set up volumes so your data isn’t lost when the container stops. The MySQL Docker image is configured to store all its data in its own /var/lib/mysql directory. We can create a Docker Volume and connect it to this directory. This will enable persistent data storage that outlives any single container instance by saving data that would originally be saved inside the container at /var/lib/mysql to our volume instead.
Stop and remove your earlier container to avoid naming conflicts:
docker stop mysql
docker rm mysql
Then start a new container with the revised configuration:
docker run --name mysql -d -p 3306:3306 -e MYSQL_ROOT_PASSWORD=abc123 -v mysql_data_container:/var/lib/mysql mysql:8
Using this command to start your MySQL container will also create a new Docker volume called mysql_data_container. It’ll be connected to the container at /var/lib/mysql, where MySQL stores its data files. Any data written to this directory will now be transparently stored in the Docker-managed volume on your host.
Repeat the steps to stop and remove your container:
docker stop mysql
docker rm mysql
Repeat the docker run command from before with the same arguments. As the mysql_data_container named volume will already exist, the new container will retain the data created by the old one. If you want to destroy the volume, use docker volume rm mysql_data_container.
