Deploying an API with DBs
Deploying our API with database access will build upon a regular deployment via GitHub using Docker, with some additions. Our repositry on GitHub will be looking like this:
📂.github
├── 📂workflows
|     └── 📄workflow.yml
📄docker-compose.yml
📄Dockerfile
📄requirements.txt
📄.gitignore
📂myproject
├── 📄__init__.py
├── 📄main.py
├── 📄database.py
├── 📄models.py
├── 📄schemas.py
└── 📄crud.py
We will be creating the necessary files needed to get our API deployed:
- 📄
.gitignore: Assures that no unnecessary files get uploaded into our repository - 📄
requirements.txt: Lists the to-install Python libraries - 📄
Dockerfile: Describes how the container image for our API will be built - 📄
workflow.yml: Builds and uploads the container image in a Github Actions cloud workflow pipeline - 📄
docker-compose.yml: Describes the deployment of our API container and data volume
📄 Creating .gitignore
First we need to create a .gitignore-file that will prevent a number of files and folders to be included in our commits. This includes files and folders generated by PyCharm as well, such as:
venv__pycache__test_main.http
And also our database folder and file:
sqlitedb*.db
Take a look at its contents here:
Details
.idea
.ipynb_checkpoints
.mypy_cache
.vscode
__pycache__
.pytest_cache
htmlcov
dist
site
.coverage
coverage.xml
.netlify
log.txt
Pipfile.lock
env3.*
env
docs_build
venv
docs.zip
archive.zip
test_main.http
sqlitedb
*.db
📄 Creating requirements.txt
The library that is needed on top of the regular libraries when working with FastAPI is sqlalchemy. As such the requirements.txt-file has the following contents:
fastapi>=0.68.0,<0.69.0
pydantic>=1.8.0,<2.0.0
uvicorn>=0.15.0,<0.16.0
sqlalchemy==1.4.42
📄 Creating Dockerfile
The Dockerfile we create for this project is similar to the one we used in the chapter on Dockerfiles, with a number of differences:
FROM python:3.10.0-slim
WORKDIR /code
EXPOSE 8000
COPY ./requirements.txt /code/requirements.txt
RUN pip install --no-cache-dir --upgrade -r /code/requirements.txt
COPY ./myproject /code
RUN mkdir -p /code/sqlitedb
CMD ["uvicorn", "main:app", "--host", "0.0.0.0", "--port", "8000"]
FROM python:3.10.0-slim: We need to use a different base image thanpython:3.10.0-alpineto make sure thatsqlalchemycan install. This is still a fairly small base image.COPY ./myproject /code: The directories we used in the repository have different names, so this reflects that. We also left out the/appsubfolder because now that we are working with a big project of multiple files, using subfolders here can lead to aModuleNotFoundError: No module named ...error.RUN mkdir -p /code/sqlitedb: We create the necessary folder for our SQLite database file right when we build the container image. This is a requirement to be able to mount this folder as a volume outside of the container to keep our database file even if the container is destroyed. The folder needs to be present in the container before we start the application. This is why we cannot rely on the Python code we included to create the folder.CMD ["uvicorn", "main:app", "--host", "0.0.0.0", "--port", "8000"]: As we do not have an/appsubfolder anymore, we can just usemain:appto start instead ofapp.main:app.
📄 Creating workflow.yml
The workflow.yml is located in the subfolder workflows in the .github folder of our repository, as usual. The contents of the file are exactly the same as we looked at in the chapter on Dockerfiles, the only difference being the container name:
name: Deliver container

on: push

jobs:
  delivery:
    runs-on: ubuntu-latest
    name: Deliver container
    steps:
      - name: Check out repository
        uses: actions/checkout@v1

      - name: Docker login
        run: docker login -u ${{ secrets.DOCKER_USER }} -p ${{ secrets.DOCKER_PASSWORD }}

      - name: Docker Build
        run: docker build -t ${{ secrets.DOCKER_USER }}/python-db-test:latest .

      - name: Upload container to Docker Hub with Push
        run: docker push ${{ secrets.DOCKER_USER }}/python-db-test:latest
📄 Creating docker-compose.yml
on Deployment:
version: "3.9"
services:
 useritem-api-service:
  image: miverboven/python-db-test
  ports:
    - "8000:8000"
  volumes:
    - sqlite_useritems_volume:/code/sqlitedb

volumes:
  sqlite_useritems_volume:
- Lines
3&4: We adjust the name of the service to something appropriate and the container image to the one we just created. - Lines
7&8: We create a volume linked to the service and container. It will place everything that is written to the/code/sqlitedbdirectory, inside the volume instead. We are able to do this because we created this directory beforehand in theDockerfile. This volume can keep existing even when the container is destroyed so our data is kept. When a new container gets deployed, linked to the same volume name ´sqlite_useritems_volume´ via the same folder/code/sqlitedbit can re-use the database file in the directory. - Lines
10&11: When we create a volume we need to declare it at the bottom of the file as well.
Deploying
All of this results in this repository. Now we are ready to deploy to Okteto:

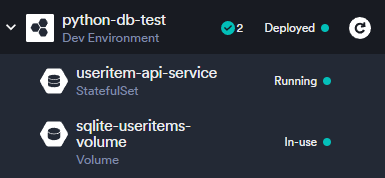
If everything went well we should see the deployment with our service holding our API container and the volume holding our SQLite database file:

Even when we destroy our deployment, this volume can keep existing and can be re-used when we deploy our deployment again:

You can now do the same tests as you did locally in the previous chapter from:
https://<SERVICE NAME>-<OKTETO ACCOUNT NAME>.cloud.okteto.net/docs
